

Prerequisites
Before you start, you need to know your VoIP username, password and the server that your number is connected to. You can do this from your Soho66 account, by clicking My Soho, then "Your Numbers", then the telephone number that you wish to connect to. The VoIP username and VoIP password are near the bottom of the page, in a section entitled VoIP Settings.
Step 1: Locating the IP Address of your Device
Plug the Ethernet cable into the LAN port on the device and the other end into your Broadband router/Network switch and obtain the phone's IP address as follows:
Newer Grandstreams (GXP2130/2140/2160)
- Press the UP and it will show the IP address of your device, something like 192.168.1.15.
Older Grandstreams (GXP1400/1405, GXP2100, GXP2120/2124)
- Press MENU (circle key inbetween the 4 arrows), select STATUS and then NETWORK STATUS and look for IPv4. The phone's IP address should appear on the phone's screen, something like 192.168.1.15. Type the IP address into a web browser's address bar on your PC/Mac. Should this be correct, it will show you the login screen for your device as shown below.
Older Grandsteam Firmware Default Password Newer Grandstream Firmware Default Password Newest Grandstream Firmware Default Username and Password
admin
admin
admin
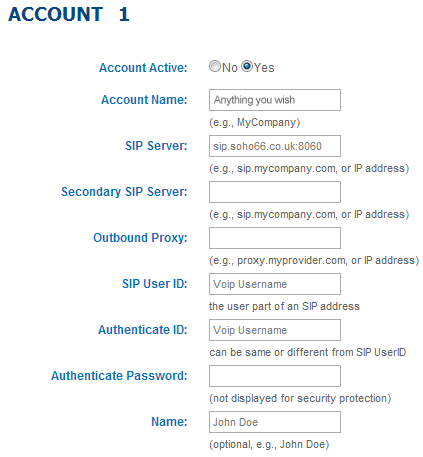
The default passwords can be found below your login screen, type the password and then press Login. The configuration page should appear. Once logged in, click on the accounts > Account 1 > General.
Configure your account as shown below:
- Set “Account Name” to anything you wish
- Set “SIP Server” to sip.soho66.co.uk:8060
- Set “SIP User ID” to your VoIP Username
- Set “Authenticate ID” to your VoIP Username
- Set “Authenticate Password” to your VoIP Password
- Set “Name” to anything you wish
Once all information has been added, click on 'Save and Apply' to save the settings for this section.
Step 2: Setting NAT Traversal
Click on 'Network Settings' on the left hand side and enter the following information:
- Set “NAT Traversal” to Keep-Alive
Once all information has been added, click on 'Save and Apply' to save the settings for this section.
Step 3: Setting the Local SIP Port
Click on 'SIP Settings' and the 'Basic' and enter the following information:
- Set “Local SIP Port” to 8061
Once all information has been added, click on 'Save and Apply' to save the settings for this section. Upon this, click on 'REBOOT' in the top right hand corner to reboot the device.
Configure your account as shown below:
- Set “SIP User ID” and “Authenticate ID” to your VoIP Username
- Set “SIP Server” to sip.soho66.co.uk:8060
- Set “Authenticate Password” to your VoIP Password

Step 2: Setting the local SIP Port and NAT Traversal
Configure your Local SIP Port and NAT Traversal options as shown below:
- Set “Local SIP port” to 8061
- Set “NAT Traversal” to Keep-Alive


Step 3: Configuring the DTMF mode
Configure your DTMF settings as shown below:
- Set DTMF to "via RTP (RFC2833)"

Click UPDATE at the bottom of the configuration page, then click to view your changes and then click REBOOT on the phone menu screen. Make sure you click UPDATE before clicking REBOOT to make sure your changes are implemented correctly.


