


Prerequisites
Before you start, you need to know your VoIP username, password and the server that your number is connected to. You can do this from your Soho66 account, by clicking My Soho, then "Your Numbers", then the telephone number that you wish to connect to. The VoIP username and VoIP password are near the bottom of the page, in a section entitled VoIP Settings.
Registering your handset
On your handset, select the following Menu > Settings > Registration > Register Handset. It will ask you for a system PIN, this is 0000. Before you enter the PIN, press and HOLD the silver button (Glows Blue) on your base station for 3 SECONDS and let go, enter the PIN and this will register the handset.
Step 1: Locating the IP address
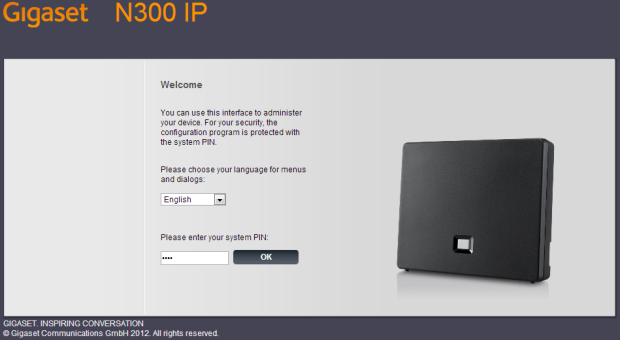
You can obtain the IP Address two different ways. You can either type in gigaset-config.com into the address bar of your web browser OR click on menu > settings > System > Network > IP Address. If you cannot see this option, your handset will need registering (See above step). DO NOT include any leading zeros, so 192.168.001.010 should actually be typed 192.168.1.10 into your web browser. You should see the following login screen:
Step 2: Configuring the Connection
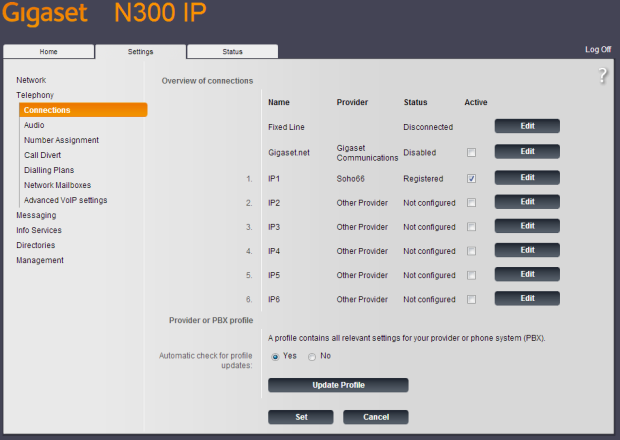
The default password is 0000. Enter this password and click OK to log in. Once logged in, click on Settings > Telephony > Connections and IP1 (this is default) as shown below:
Step 3: Configuring your account
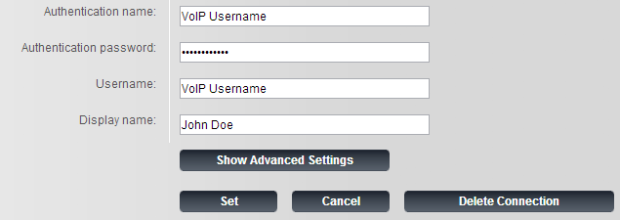
Click on Edit on a connection to start configuring your base station. Enter the details shown below:
- Set “Authentication Name” to VoIP Username
- Set “Authentication Password” to VoIP Password
- Set “Username” to VoIP Username
- Set “Display Name” to anything you wish
Step 4: Configuring your account - Advanced Settings
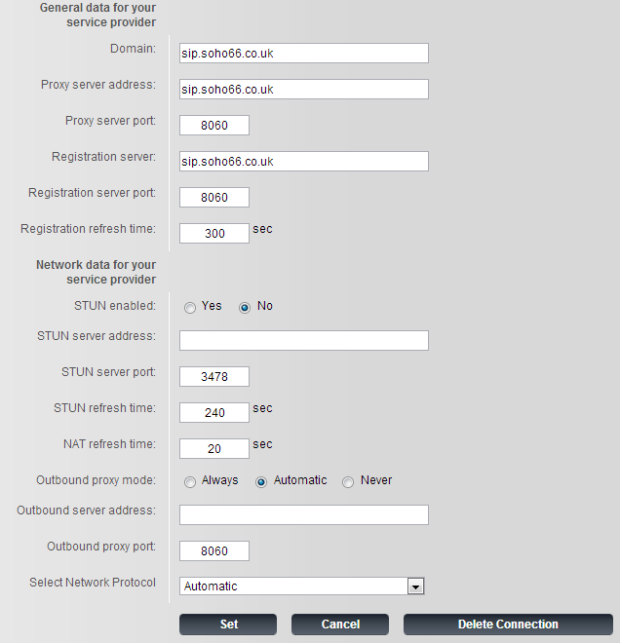
Once complete, click on Show Advanced Settings and enter the following settings shown below:
- Set “Domain” to sip.soho66.co.uk
- Set “Proxy Server Address” to sip.soho66.co.uk
- Set “Proxy Server Port” to 8060
- Set “Registration Server” to sip.soho66.co.uk
- Set “Registration Server Port” to 8060
- Set “Outbound Proxy Port” to 8060
Step 5: Setting the DTMF mode
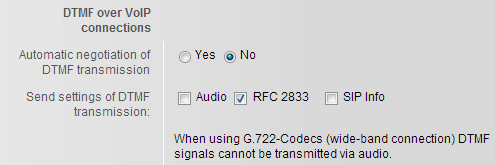
Once entered, click on Set and locate Advanced VoIP Settings on the left hand side of the page and enter the following as shown below:
- Set “Auto DTMF Transmission” to No
- Set “DTMF Transmission” to RFC 2833
Step 6: Setting the Local SIP Ports
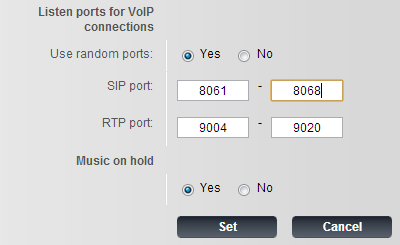
Once you have set the DTMF mode, you need to set the local SIP ports to match below:
- Set “Use Random Ports” to Yes
- Set “SIP Port” to 8061 – 8068
- Set “RTP Port” to 9004 – 9020
Step 7: Reset and Reboot
Click on "Set" to save the changes. Then click on Management on the left hand side, Reboot and Reset > Reboot. Once rebooted, your device will then be connected up to your Soho66 Service.


